OpenCV UPDATE + ROI
Hey, welcome back to another OpenCV update. Today I will be talking about two seperate things, that I have combined in one post.
My OpenCV Update
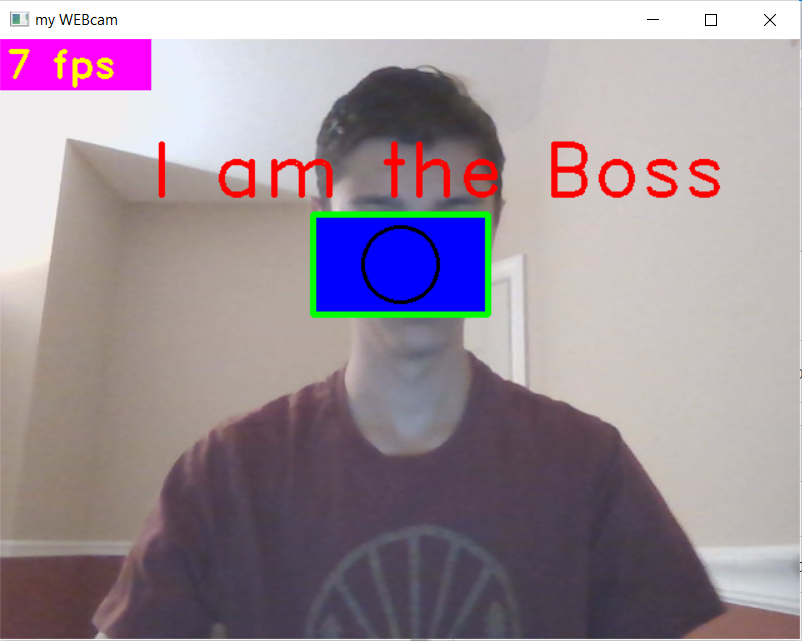
Hello, I just wanted to give a quick update on my progress on learning AI. I am now able to calculate FPS (frames per second) and put/add text or shapes to the frame window:
import cv2
print(cv2.__version__)
import time
width=640
height=360
myRadius=30
myColor=(0,0,0)
myThick=2
fontH=2
fontT=2
myText='Paul is Boss'
myFont=cv2.FONT_HERSHEY_DUPLEX
upperLeft=(250,140)
lowerRight=(390,220)
lineW=4
cam=cv2.VideoCapture(0,cv2.CAP_DSHOW)
cam.set(cv2.CAP_PROP_FRAME_WIDTH, width)
cam.set(cv2.CAP_PROP_FRAME_HEIGHT,height)
cam.set(cv2.CAP_PROP_FPS, 10)
cam.set(cv2.CAP_PROP_FOURCC,cv2.VideoWriter_fourcc(*'MJPG'))
tLast=time.time()
fpsFLT=10
time.sleep(.1)
while True:
    dT=time.time()-tLast
    fps=1/dT
    fpsFLT=fpsFLT*.9+fps*.1
    print(fps)
    tLast=time.time()
    ignore,  frame = cam.read()
    frame[140:220,250:390]=(255,0,0)
    cv2.rectangle(frame,upperLeft,lowerRight,(0,255,0),lineW)
    cv2.circle(frame,(int(width/2),int(height/2)),myRadius,myColor,myThick)
    cv2.putText(frame,myText,(120,125),myFont,fontH,(0,0,255),fontT)
    cv2.rectangle(frame,(0,0),(120,40),(255,0,255),-1)
    cv2.putText(frame,str(int(fpsFLT))+' fps',(5,30),myFont,1,(0,255,255),2)
    cv2.imshow('my WEBcam', frame)
    cv2.moveWindow('my WEBcam',0,0)
    if cv2.waitKey(1) & 0xff ==ord('q'):
        break
cam.release()
And if you run it, it should give a window that looks like this:

Here is how the code works:
After variable declerations:
width=640
height=360
myRadius=30
myColor=(0,0,0)
myThick=2
fontH=2
fontT=2
myText='I am the Boss'
myFont=cv2.FONT_HERSHEY_DUPLEX
upperLeft=(250,140)
lowerRight=(390,220)
lineW=4
we set up a VideoCapture object using Opencv that allows us to use the webcam.
This code sets up the webcam with specific variables:
cam=cv2.VideoCapture(0,cv2.CAP_DSHOW)
cam.set(cv2.CAP_PROP_FRAME_WIDTH, width) #adjust width
cam.set(cv2.CAP_PROP_FRAME_HEIGHT,height) # adjust height
cam.set(cv2.CAP_PROP_FPS, 10) # fps
cam.set(cv2.CAP_PROP_FOURCC,cv2.VideoWriter_fourcc(*'MJPG'))
In the main loop, we calculate fps, by counting how long it took to complete one loop (the time it takes to get the next frame):
dT=time.time()-tLast
    fps=1/dT
    fpsFLT=fpsFLT*.9+fps*.1
    print(fps)
    tLast=time.time()
And with this code, I put some text and images on the window:
ignore,  frame = cam.read()
    frame[140:220,250:390]=(255,0,0)
    cv2.rectangle(frame,upperLeft,lowerRight,(0,255,0),lineW)
    cv2.circle(frame,(int(width/2),int(height/2)),myRadius,myColor,myThick)
    cv2.putText(frame,myText,(120,125),myFont,fontH,(0,0,255),fontT)
    cv2.rectangle(frame,(0,0),(120,40),(255,0,255),-1)
    cv2.putText(frame,str(int(fpsFLT))+' fps',(5,30),myFont,1,(0,255,255),2)
    cv2.imshow('my WEBcam', frame)
    cv2.moveWindow('my WEBcam',0,0)
    if cv2.waitKey(1) & 0xff ==ord('q'):
        break
That’s it!! Hope you enjoyed this!! See you next time to talk about ROIs!!
Regions of Interest (or ROIs)
Now, I will talk about Regions of Interest (or ROIs). Think of it like carving out that piece of chocolate cake that has the good topping! Simply put, it’s taking a specific portion of a frame.
To start, I want to show the full code, so you can follow along with me:
import cv2
print(cv2.__version__)
width=640
height=360
cam=cv2.VideoCapture(0,cv2.CAP_DSHOW)
cam.set(cv2.CAP_PROP_FRAME_WIDTH, width)
cam.set(cv2.CAP_PROP_FRAME_HEIGHT,height)
cam.set(cv2.CAP_PROP_FPS, 30)
cam.set(cv2.CAP_PROP_FOURCC,cv2.VideoWriter_fourcc(*'MJPG'))
while True:
    ignore,  frame = cam.read()
    frameROI=frame[150:210,250:390]
    frameROIGray=cv2.cvtColor(frameROI,cv2.COLOR_BGR2GRAY)
    frameROIBGR=cv2.cvtColor(frameROIGray,cv2.COLOR_GRAY2BGR)
    cv2.imshow('My BGR ROI', frameROIGray)
    cv2.moveWindow('My BGR ROI',650,180)

    frame[0:60,0:140]=frameROI
    cv2.imshow('My Gray ROI', frameROIGray)
    cv2.moveWindow('My Gray ROI',650,90)
    cv2.imshow('My ROI', frameROI)
    cv2.moveWindow('My ROI',650,0)
    cv2.imshow('my WEBcam', frame)
    cv2.moveWindow('my WEBcam',0,0)
    if cv2.waitKey(1) & 0xff ==ord('q'):
        break
cam.release()
So, moving away from the stuff discussed in the previous posts, I just want to show what’s new.
If we treat the frames as a 2D array:
then we can easily acces parts or sections of this frame (array) using Python:
frameROI=frame[150:210,250:390]
here, we are accessing all pixels from 150 to 210 (on the y-axis) and from 250 to 390 (on the x-axis).
We can then convert this to a Grayscale image or BGR, respectively, with this function:
    frameROIGray=cv2.cvtColor(frameROI,cv2.COLOR_BGR2GRAY)
    frameROIBGR=cv2.cvtColor(frameROIGray,cv2.COLOR_GRAY2BGR)
Finally, with the code here, we make a brand new frame to show in another window:
    frame[0:60,0:140]=frameROI
    cv2.imshow('My Gray ROI', frameROIGray)
    cv2.moveWindow('My Gray ROI',650,90)
    cv2.imshow('My ROI', frameROI)
    cv2.moveWindow('My ROI',650,0)
    cv2.imshow('my WEBcam', frame)
    cv2.moveWindow('my WEBcam',0,0)
    if cv2.waitKey(1) & 0xff ==ord('q'):
        break
cam.release()
Question
Can you guess what this line does:
frame[0:60,0:140]=frameROI
*hint: replace
Subscribe to Burak Ayyorgun
Get the latest posts delivered right to your inbox